これはNext.jsの公式チュートリアルの3. Optimizing Fonts and Images に関するメモです
前章のメモ
Next.jsの公式チュートリアルの該当ページ
学ぶこと
- next/font でカスタムフォントを追加する方法
- next/image で画像を追加する方法
- Next.jsでのフォントや画像の最適化
なぜフォントを最適化するのか?
next/fontを使用すると、ビルド時にフォントファイルをダウンロードします。
ダウンロードされているフォントファイルを使うのでアプリのパフォーマンスが向上します
プライマリーフォントを追加する
カスタムGoogleをアプリに追加してみます。
/app/ui/fonts.ts ファイルを作成し、アプリ全体で使うフォントを定義します。
今回はInterというフォントを使用し、latin文字のみをサブセット化してみます
|
1 2 3 |
import { Inter } from 'next/font/google'; export const inter = Inter({ subsets: ['latin'] }); |
/app/ui/fonts.ts をアプリ全体に適用させるために /app/layout.tsx で読み込みます
インポートしてbodyのclassNameに追加します。
また、antialiased はTailwindのクラスでフォントを滑らかにしてくれます
|
1 2 3 4 5 6 7 8 9 10 11 12 13 14 |
import '@/app/ui/global.css'; import { inter } from '@/app/ui/fonts'; export default function RootLayout({ children, }: { children: React.ReactNode; }) { return ( <html lang="en"> <body className={`${inter.className} antialiased`}>{children}</body> </html> ); } |
アプリにアクセスすると、フォントが変更されていると思います
セカンダリーフォントを追加する
Lusitanaというフォントを追加してみます。
先ほどと同じように/app/ui/fonts.ts でフォントをインポートし、サブセット化していきます。
Lusitanaを見てみると、font weightが400と700なのでこれも指定します。
|
1 2 3 4 5 6 7 8 |
import { Inter, Lusitana } from 'next/font/google'; export const inter = Inter({ subsets: ['latin'] }); export const lusitana = Lusitana({ weight: ['400', '700'], subsets: ['latin'], }); |
これを /app/page.tsx のpタグに適用させます
|
1 2 3 4 5 6 7 8 9 10 11 12 13 14 15 16 17 18 19 20 21 |
import AcmeLogo from '@/app/ui/acme-logo'; import { ArrowRightIcon } from '@heroicons/react/24/outline'; import Link from 'next/link'; import styles from '@/app/ui/home.module.css'; import { lusitana } from '@/app/ui/fonts'; export default function Page() { return ( <main className="flex min-h-screen flex-col p-6"> <div className="flex h-20 shrink-0 items-end rounded-lg bg-blue-500 p-4 md:h-52"> <AcmeLogo /> </div> <div className="mt-4 flex grow flex-col gap-4 md:flex-row"> <div className="flex flex-col justify-center gap-6 rounded-lg bg-gray-50 px-6 py-10 md:w-2/5 md:px-20"> {/* <div className="h-0 w-0 border-b-[30px] border-l-[20px] border-r-[20px] border-b-black border-l-transparent border-r-transparent" /> */} <div className={styles.shape} /> <p className={`${lusitana.className} text-xl text-gray-800 md:text-3xl md:leading-normal`} > <strong>Welcome to Acme.</strong> This is the example for the{' '} ... |
11行目の <AcmeLogo /> のコメントアウトも併せて外しておきます。
このコンポーネントのコードを見るとlusitanaをインポートしているのでエラーになっていました。
ただ、lusitanaを定義したことでこのコンポーネントが使用可能になりました。
|
1 2 3 4 5 6 7 8 9 10 11 12 13 |
import { GlobeAltIcon } from '@heroicons/react/24/outline'; import { lusitana } from '@/app/ui/fonts'; export default function AcmeLogo() { return ( <div className={`${lusitana.className} flex flex-row items-center leading-none text-white`} > <GlobeAltIcon className="h-12 w-12 rotate-[15deg]" /> <p className="text-[44px]">Acme</p> </div> ); } |
<Image>コンポーネント
<Image>コンポーネントは<img>タグの拡張で、下記の自動画像最適化機能を提供している
- 画像読み込み時のレイアウトずれを防ぐ
- デバイスごとに画像のサイズを変更する
- 画像の遅延読み込み
- ブラウザがサポートしている場合に、WebPやAVIFなど最新の画像ファイルをサポート
デスクトップヒーロー画像の追加
<Image>コンポーネントを使って、デスクトップのヒーロー画像を追加します。
画像は /public/hero-desktop.png を使います。
/app/page.tsx でnext/imageよりインポートして、<Image>コンポーネントを追加します。
srcに記載するパスはpublicをルートとして指定しています。
|
1 2 3 4 5 6 7 8 9 10 11 12 13 14 15 16 17 18 19 20 21 22 23 |
import AcmeLogo from '@/app/ui/acme-logo'; import { ArrowRightIcon } from '@heroicons/react/24/outline'; import Link from 'next/link'; import styles from '@/app/ui/home.module.css'; import { lusitana } from '@/app/ui/fonts'; import Image from 'next/image'; export default function Page() { return ( .... {/* Add Hero Images Here */} <Image src="/hero-desktop.png" width={1000} height={760} className="hidden md:block" alt="Screenshots of the dashboard project showing desktop version" /> </div> </div> </main> ); } |
また、
- レイアウトずれを回避するためにwidthとheightを指定。
- hidden と md:blockを組み合わせて、768px以上のwidthのときのみ画像を表示させています
- hidden = display:none で画像を非表示
- md: block = 768px以上のwidthのみdisplay: blockを付与
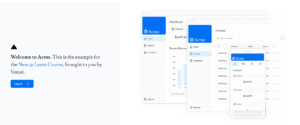
アプリにアクセスすると↓のように右側に画像が表示されます

モバイル用のヒーローイメージを追加
- /public/hero-mobile.png を使う
- 画像はwidth:560px, height:620px
- モバイルでは表示されるが、デスクトップでは非表示
↑の要件で追加します。
先ほどの/app/page.tsx <Image>コンポーネントの下に追加していきます
画像ファイルやwidth,、heightを変更します。
classNameは、デスクトップ画像が出ないとき(=widthが768px未満)の時に表示させたいので
基本block(display: block) でmd:hidden(768px以上の時display: hidden)としておきます
|
1 2 3 4 5 6 7 8 9 10 11 12 13 14 15 16 17 18 19 20 21 22 23 24 25 |
... export default function Page() { return ( .... {/* Add Hero Images Here */} <Image src="/hero-desktop.png" width={1000} height={760} className="hidden md:block" alt="Screenshots of the dashboard project showing desktop version" /> <Image src="/hero-mobile.png" width={560} height={620} className="block md:hidden" alt="Screenshots of the dashboard project showing mobile version" /> </div> </div> </main> ); } |
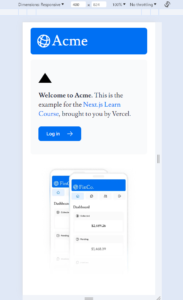
ブラウザから確認します。普通に表示すると、デスクトップの方の画像が表示されます。
モバイルでの表示を確認したいときはF12⇒Ctrl+Shift+Mを押します。(Chrome)

関連ドキュメント
- Image Optimization Docs
- Font Optimization Docs
- Improving Web Performance with Images (MDN)
- Web Fonts (MDN)
次章のメモ


コメント