Dockerについて勉強しないとな
とおもったので、筆者が使用してるReact+DRFのアプリケーション動作環境をコンテナ化します
また、デプロイやアプリの運用とかを考えてNginxとMySQLのコンテナも作成します
本記事の前提
対象読者
・ReactやDjango(DRF)を触ったことがある
→本記事ではReactやDjangoについて詳細は省きます
・ReactやDjangoの動作環境をコンテナ化してみたい
・Dockerに関して詳しく知りたいよりはとにかくコンテナを作成したい
→設定の詳細は省きます、とりあえず動けばいいというスタンスで!
ゴール
React+Djangoの動作環境をコンテナで作成し、
Reactのスタート画面およびDjangoの管理画面にアクセスできること
作成するコンテナの概要
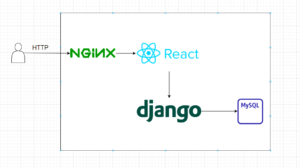
ユーザーからのアクセスの流れはこんな感じです

上記の図から、必要なコンテナは
- NodeJS(React用)
- Python(Djnago用)
- MySQL
- Nginx
になります
ディレクトリ構成
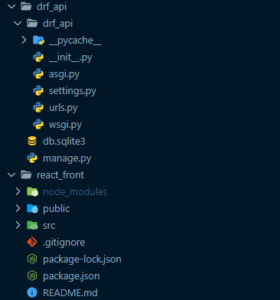
コンテナ化前
Djnagoと、Reactのプロジェクトをそれぞれ作成したのみです

コンテナ化後
下記Gitのリポジトリをご参照ください
コンテナを作成する順番
- NodeJS(React用)
- Python(Djnago用)
- MySQL
- Nginx
この4つのコンテナを作成していきます。
順番ですが、ユーザーから遠いコンテナ(内側のコンテナ)から作成していきます
なので、MySQL→Python→NodeJS→Nginx と作っていきます
また、複数のコンテナを作成するということで一番上の階層に
docker-compose.yml ファイルを作成します
MySQL

まずは、一番上の階層に「mysql」というフォルダを作成します(↑の画像参照)
機密情報
mysqlのコンテナをたてる記事にはdocker-composeにDBのパスワードを直書きしているものが
多いです。。
個人的には設定ファイルにパスワード等機密情報を直書きしたくないので、
別でファイルを作成し、コンテナを立てるときにそのファイルを読みにいくようにします
mysqlフォルダないに「secrets」というフォルダを作成して、その配下に
- root_secret.txt:root ユーザーのパスワードを記載
- user_secret.txt:user ユーザー(Djangoが使用)のパスワードを記載
ファイルの中身はこんな感じです。適当にパスワードを記載してください
|
1 |
rootpass |
|
1 |
password |
イメージ作成時に実行するSQL
イメージを作成しただけだと、Djangoが使用するユーザーに権限が何もないです。
そこで、権限を付与するSQLファイルを作成し、イメージ作成時に実行します
mysqlフォルダ配下に sql フォルダを作成し、その中に init.sql を作成。
中身はこちら
|
1 2 3 4 5 |
-- Djangoが使用するユーザー(user)にdjangoというDBの全権限を付与 GRANT ALL PRIVILEGES ON django.* TO 'user'@'%'; -- 権限を反映 FLUSH PRIVILEGES; |
my.cnf
文字コードの設定をmy.cnf(MySQLの設定ファイル)に書いていきます
mysql/sql配下にmy.cnfファイルを作成します
|
1 2 3 4 5 6 7 8 9 10 11 12 13 14 15 16 17 18 19 20 21 22 23 24 25 26 27 28 29 |
# MySQLサーバーへの設定 [mysqld] # 文字コード/照合順序の設定 character_set_server=utf8mb4 collation_server=utf8mb4_bin # タイムゾーンの設定 default_time_zone=SYSTEM log_timestamps=SYSTEM # デフォルト認証プラグインの設定 default_authentication_plugin=mysql_native_password #エラーログの確認 log-error=/var/log/mysql/error.log #クエリログを表示 general_log=1 general_log_file=/var/log/mysql/query.log # mysqlオプションの設定 [mysql] # 文字コードの設定 default_character_set=utf8mb4 # mysqlクライアントツールの設定 [client] # 文字コードの設定 default_character_set=utf8mb4 |
Dockerfile
このファイルをもとにコンテナのイメージを作成します
詳しくはこちら!
今回はタイムゾーンや文字コードの設定を行っていきます。
→先ほど作成した my.cnf を読み込むようにします(相対パスで指定)
|
1 2 3 4 5 |
FROM mysql:8.0.0 RUN echo "USE mysql;" > /docker-entrypoint-initdb.d/timezones.sql && mysql_tzinfo_to_sql /usr/share/zoneinfo >> /docker-entrypoint-initdb.d/timezones.sql COPY ./my.cnf /etc/mysql/conf.d/my.cnf |
docker-compose.yml
docker-compose.ymlの中身に以下を記載します
|
1 2 3 4 5 6 7 8 9 10 11 12 13 14 15 16 17 18 19 20 21 22 23 24 25 26 27 28 29 30 31 32 33 34 35 36 37 |
version: "3.9" services: db: container_name: mysql_db build: ./mysql command: mysqld --character-set-server=utf8mb4 --collation-server=utf8mb4_unicode_ci ports: - "3306:3306" environment: MYSQL_ROOT_PASSWORD_FILE: /run/secrets/db_root_password # rootのパスワード MYSQL_DATABASE: django # djangoが使用するDB MYSQL_USER: user # djangoが使用するユーザー MYSQL_PASSWORD_FILE: /run/secrets/db_password # MYSQL_USERのパスワード TZ: "Asia/Tokyo" secrets: - db_password - db_root_password volumes: - ./mysql/mysql_volume:/var/lib/mysql - ./mysql/sql:/docker-entrypoint-initdb.d - ./logs/mysql:/var/log/mysql networks: - backend_network networks: backend_network: driver: bridge volumes: static_volume: # 機密情報ファイルをイメージへコピー secrets: db_password: file: ./mysql/secrets/user_secret.txt db_root_password: file: ./mysql/secrets/root_secret.txt |
SQLのログを保存しておくフォルダを作成
docker-compose.ymlがある階層にlogsフォルダを作成し、
その配下にmysqlフォルダを作成します
|
1 2 3 4 5 6 7 |
. ├── docker-compose.yml ├── drf_api ├── logs # 作成 └── mysql # 作成 ├── mysql └── react_front |
mysqlフォルダ内の構成を確認
↓のようになっていればOK!
|
1 2 3 4 5 6 7 8 9 |
mysql ├── Dockerfile ├── my.cnf ├── mysql_volume ├── secrets │ ├── root_secret.txt │ └── user_secret.txt └── sql └── init.sql |
コンテナを立ち上げてみる
docker-compose.ymlがある階層に移動して、docker-compose up -d を実行します
筆者は、React+Djangoフォルダ配下にdocker-compose.ymlがあります
|
1 2 3 4 5 6 7 8 9 10 11 12 13 14 15 16 17 18 19 20 21 22 23 24 25 26 27 |
// イメージ作成&コンテナ起動 PS C:\Users\*****\Desktop\React+Django> docker-compose up -d [+] Building 1.6s (9/9) FINISHED => [internal] load build definition from Dockerfile 0.0s => => transferring dockerfile: 32B 0.0s => => transferring context: 2B 0.0s => [internal] load metadata for docker.io/library/mysql:8.0.0 1.5s => [auth] library/mysql:pull token for registry-1.docker.io 0.0s => [internal] load build context 0.0s => => transferring context: 707B 0.0s => [1/3] FROM docker.io/library/mysql:8.0.0@sha256:449cb894b00a490e830bb9b2d774bf99c5af75e8cb10bfbe74db1c43eb12b211 0.0s => CACHED [2/3] RUN echo "USE mysql;" > /docker-entrypoint-initdb.d/timezones.sql && mysql_tzinfo_to_sql /usr/share/zoneinfo >> /docker-entrypoint-initdb.d/timezones.sql 0.0s => [3/3] COPY ./my.cnf /etc/mysql/conf.d/my.cnf 0.0s => exporting to image 0.0s => => exporting layers 0.0s => => writing image sha256:fb55315d8a99b22190c57f3cf86bb003e569e5e4a3ebbb6e5f9dbeba93bbfb36 0.0s => => naming to docker.io/library/reactdjango-db 0.0s Use 'docker scan' to run Snyk tests against images to find vulnerabilities and learn how to fix them [+] Running 2/2 - Network reactdjango_backend_network Created 0.0s - Container mysql_db Started // コンテナの状態を確認 0.5s PS C:\Users\*****\Desktop\React+Django> docker ps -a CONTAINER ID IMAGE COMMAND CREATED STATUS PORTS NAMES b206adbd43f9 reactdjango-db "docker-entrypoint.s…" 57 seconds ago Up 56 seconds 0.0.0.0:3306->3306/tcp mysql_db PS C:\Users\*****\Desktop\React+Django> |
起動できたようです
コンテナに入ってみる
先ほどと同じ階層で以下のコマンドを実行していきます
|
1 2 3 4 5 6 7 8 9 10 11 12 13 14 15 16 17 18 19 20 21 22 23 24 25 26 27 28 29 30 31 32 33 34 35 36 37 38 39 40 41 42 43 |
// mysql のコンテナに入る PS C:\Users\*****\Desktop\React+Django> docker-compose exec db /bin/bash // mysql にログインする root@b206adbd43f9:/# mysql -u user -p Enter password: Welcome to the MySQL monitor. Commands end with ; or \g. Your MySQL connection id is 6 Server version: 8.0.0-dmr-log MySQL Community Server (GPL) Copyright (c) 2000, 2016, Oracle and/or its affiliates. All rights reserved. Oracle is a registered trademark of Oracle Corporation and/or its affiliates. Other names may be trademarks of their respective owners. Type 'help;' or '\h' for help. Type '\c' to clear the current input statement. // DBを確認(djangoがあることを確認する) mysql> SHOW DATABASES; +--------------------+ | Database | +--------------------+ | django | | information_schema | +--------------------+ 2 rows in set (0.01 sec) // djangoを使用 mysql> USE django; Database changed // テーブルは何もないはず(この後作成される) mysql> SHOW TABLES; Empty set (0.00 sec) // mysqlからログアウト mysql> exit Bye // コンテナからも抜ける root@b206adbd43f9:/# exit exit PS C:\Users\*****\Desktop\React+Django> |
これでMySQLのコンテナはできました
Python(Django)
.env
ローカルで使用する環境変数のファイルを作成します
drf_api フォルダ配下に.env.developmentを作成します
|
1 2 3 4 5 6 7 8 9 10 11 12 13 14 15 16 |
######### # for app ######### # 0:not debug mode / 1: debug mode DEBUG=1 # Django unique secret key value SECRET_KEY=foo # DB設定 DB_ENGINE=django.db.backends.mysql DB_NAME=django DB_USER=user DB_PASSWORD=password DB_HOST=db DB_PORT=3306 |
settings.py
先ほど作成したenvファイルを読み込むためにsettings.pyを編集します
以下変更点のみを記載しています
|
1 2 3 4 5 6 7 8 9 10 11 12 13 14 15 16 17 18 19 |
import os DEBUG = int(os.environ.get("DEBUG", default=0)) SECRET_KEY = os.environ.get("SECRET_KEY", "foo") ALLOWED_HOSTS = ["*"] DATABASES = { "default": { "ENGINE": os.environ.get("DB_ENGINE"), "NAME": os.environ.get("DB_NAME"), "USER": os.environ.get("DB_USER"), "PASSWORD": os.environ.get("DB_PASSWORD"), "HOST": os.environ.get("DB_HOST"), "PORT": os.environ.get("DB_PORT"), } } STATIC_URL = '/static/' STATIC_ROOT = "/usr/share/nginx/html/static" |
requirements.txt
pip でインストールするモジュールの情報をrequirements.txtに記載します
requirements.txt は drf_api フォルダ配下に作成します
|
1 2 3 4 5 6 7 8 9 10 |
asgiref==3.2.7 Django==3.0.5 django-cors-headers==3.2.1 djangorestframework==3.11.0 gunicorn==20.0.4 psycopg2-binary==2.8.5 python-dotenv==0.13.0 pytz==2019.3 sqlparse==0.3.1 mysqlclient==2.0.2 |
Dockerfile
drf_api フォルダ配下にDockerfileを作成します
|
1 2 3 4 5 6 7 8 9 10 11 12 13 14 15 16 17 18 19 20 |
# set base image FROM python:3.7 # set environment variables ENV PYTHONDONTWRITEBYTECODE 1 ENV PYTHONUNBUFFERED 1 # set work directory WORKDIR /home/app/api # install dependencies COPY requirements.txt ./ RUN python3 -m pip install --upgrade pip setuptools RUN pip install -r requirements.txt # Copy project COPY . ./ # Expose application port EXPOSE 8000 |
docker-compose.yml
以下を追記します
|
1 2 3 4 5 6 7 8 9 10 11 12 13 14 15 16 17 18 19 20 21 22 23 24 25 26 |
version: "3.9" services: --追加-------------- django: container_name: django build: ./drf_api/. ports: - "8000:8000" env_file: - ./drf_api/.env.development volumes: - ./drf_api:/home/app/api/ - static_volume:/home/app/api/static # <-- bind the static volume stdin_open: true tty: true command: gunicorn --bind :8000 drf_api.wsgi:application networks: - backend_network environment: - CHOKIDAR_USEPOLLING=true depends_on: - db --ここまで---------- db: (--略--) |
コンテナを立ち上げてみる
|
1 2 3 4 5 6 7 8 9 10 11 12 13 14 15 16 17 18 19 20 21 22 23 24 25 26 27 28 29 30 31 32 33 34 35 36 37 38 39 40 41 42 43 44 45 46 47 48 49 50 51 52 53 54 55 56 57 58 59 60 61 62 63 64 65 66 67 68 69 |
PS C:\Users\*****\Desktop\React+Django> docker-compose up -d [+] Building 1.6s (12/12) FINISHED => [internal] load build definition from Dockerfile 0.0s => => transferring dockerfile: 32B 0.0s => [internal] load .dockerignore 0.0s => => transferring context: 2B 0.0s => [internal] load metadata for docker.io/library/python:3.7 1.5s => [1/6] FROM docker.io/library/python:3.7@sha256:764e6916eaf724784670413f823eb2e795ca01f031ec0a9b0f0f9e75c2c7ce7c 0.0s => [internal] load build context 0.0s => => transferring context: 4.37kB 0.0s => CACHED [2/6] WORKDIR /home/app/api 0.0s => CACHED [3/6] COPY requirements.txt ./ 0.0s => CACHED [4/6] RUN python3 -m pip install --upgrade pip setuptools 0.0s => CACHED [5/6] RUN pip install -r requirements.txt 0.0s => [6/6] COPY . ./ 0.0s => exporting to image 0.0s => => exporting layers 0.0s => => writing image sha256:94b7025d19adf41e8cf0fc81657f31fd081d9ee133f9285bbdf8fc0e71b2f712 0.0s => => naming to docker.io/library/reactdjango-django 0.0s Use 'docker scan' to run Snyk tests against images to find vulnerabilities and learn how to fix them [+] Running 2/2 - Container mysql_db Started 0.5s - Container django Started // 静的ファイル 1.0s PS C:\Users\*****\Desktop\React+Django> docker-compose run --rm django sh -c "python manage.py collectstatic" [+] Running 1/0 - Container mysql_db Running 0.0s 130 static files copied to '/usr/share/nginx/html/static'. // DBの初期作成 PS C:\Users\*****\Desktop\React+Django> docker-compose run --rm django sh -c "python manage.py migrate" +] Running 1/0 - Container mysql_db Running 0.0s Operations to perform: Apply all migrations: admin, auth, contenttypes, sessions Applying contenttypes.0001_initial... OK Applying auth.0001_initial... OK Applying admin.0001_initial... OK Applying admin.0002_logentry_remove_auto_add... OK Applying admin.0003_logentry_add_action_flag_choices... OK Applying contenttypes.0002_remove_content_type_name... OK Applying auth.0002_alter_permission_name_max_length... OK Applying auth.0003_alter_user_email_max_length... OK Applying auth.0004_alter_user_username_opts... OK Applying auth.0005_alter_user_last_login_null... OK Applying auth.0006_require_contenttypes_0002... OK Applying auth.0007_alter_validators_add_error_messages... OK Applying auth.0008_alter_user_username_max_length... OK Applying auth.0009_alter_user_last_name_max_length... OK Applying auth.0010_alter_group_name_max_length... OK Applying auth.0011_update_proxy_permissions... OK Applying sessions.0001_initial... OK // superuserの作成 PS C:\Users\*****\Desktop\React+Django> docker-compose run --rm django sh -c "python manage.py createsuperuser" [+] Running 1/0 - Container mysql_db Running 0.0s Username (leave blank to use 'root'): Email address: Password: Password (again): The password is too similar to the username. This password is too short. It must contain at least 8 characters. This password is too common. Bypass password validation and create user anyway? [y/N]: y Superuser created successfully. |
起動できました
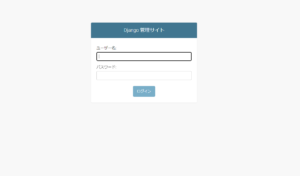
にアクセスして、↓のように表示されたらOKです

Nginxのコンテナを立てていないため、管理画面のCSSは効いていませんのでご注意を

先ほど、作成したsuperuserでログインできればOKです
DBを見てみる
|
1 2 3 4 5 6 7 8 9 10 11 12 13 14 15 16 17 18 19 20 21 22 23 24 25 26 27 28 29 30 31 32 33 34 35 36 37 38 39 40 41 42 |
PS C:\Users\*****\Desktop\React+Django> docker-compose exec db /bin/bash root@3222a65b607a:/# mysql -u user -p Enter password: Welcome to the MySQL monitor. Commands end with ; or \g. Your MySQL connection id is 17 Server version: 8.0.0-dmr-log MySQL Community Server (GPL) Copyright (c) 2000, 2016, Oracle and/or its affiliates. All rights reserved. Oracle is a registered trademark of Oracle Corporation and/or its affiliates. Other names may be trademarks of their respective owners. Type 'help;' or '\h' for help. Type '\c' to clear the current input statement. mysql> USE django; Reading table information for completion of table and column names You can turn off this feature to get a quicker startup with -A Database changed mysql> SHOW TABLES; +----------------------------+ | Tables_in_django | +----------------------------+ | auth_group | | auth_group_permissions | | auth_permission | | auth_user | | auth_user_groups | | auth_user_user_permissions | | django_admin_log | | django_content_type | | django_migrations | | django_session | +----------------------------+ 10 rows in set (0.01 sec) mysql> exit Bye root@3222a65b607a:/# exit exit PS C:\Users\*****\Desktop\React+Django> |
NodeJS(React)
docker-compose.yml
docker-compose.ymlに以下を追記するのみです
|
1 2 3 4 5 6 7 8 9 10 11 12 13 14 15 16 17 18 19 20 21 22 23 24 25 |
version: "3.9" services: -----略--------- -----追加------- react: container_name: react image: node:14.13.1 volumes: - ./react_front:/home/app/front ports: - 3000:3000 working_dir: /home/app/front command: [bash, -c, npm upgrade --no-progress --network-timeout 1000000 && npm install && npm start] networks: - frontend_network -----ここまで--- networks: backend_network: driver: bridge -----追加------- frontend_network: driver: bridge -----ここまで--- -----略--------- |
コンテナを立ち上げてみる
|
1 2 3 4 5 6 7 8 9 10 11 12 13 14 15 16 17 18 |
PS C:\Users\*****\Desktop\React+Django> docker-compose up -d [+] Running 10/10 - react Pulled 31.1s - 0400ac8f7460 Pull complete 8.4s - fa8559aa5ebb Pull complete 8.6s - da32bfbbc3ba Pull complete 8.7s - e1dc6725529d Pull complete 10.8s - 572866ab72a6 Pull complete 27.1s - 63ee7d0b743d Pull complete 27.1s - edecccb83d49 Pull complete 27.8s - bc759b1ea810 Pull complete 27.9s - c672a0c72296 Pull complete 27.9s [+] Running 4/4 - Network reactdjango_frontend_network Created 0.0s - Container reactdjango-react-1 Started 1.0s - Container mysql_db Started 1.2s - Container django Started 1.7s PS C:\Users\*****\Desktop\React+Django> |
起動できましたー
ブラウザからアクセスしてみる
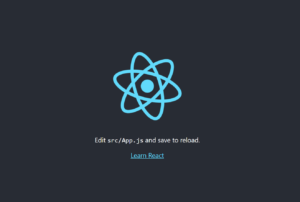
にアクセスします(少し時間をおいてからのほうがいいかも?)

こちらが表示されていればOKです
Nginx
一番上の階層にnginxというフォルダを作成し、下記のようにファイルを作成します

default.conf
nginxをconfファイルです。イメージ作成時にこのファイルをコピーし、設定を反映させます
|
1 2 3 4 5 6 7 8 9 10 11 12 13 14 15 16 17 18 19 20 21 22 23 24 25 26 27 28 29 30 31 32 33 34 35 36 37 38 39 40 41 42 43 44 45 46 47 48 49 50 51 52 |
upstream react { server react:3000; } upstream django { server django:8000; } server { listen 80; location = /favicon.ico { access_log off; log_not_found off; } location = /healthz { return 200; } location / { proxy_pass http://react; proxy_set_header Host $host; proxy_set_header X-Forwarded-For $proxy_add_x_forwarded_for; proxy_redirect off; } location /sockjs-node { proxy_pass http://react; proxy_http_version 1.1; proxy_set_header Upgrade $http_upgrade; proxy_set_header Connection "upgrade"; } location /admin/ { proxy_pass http://django/admin/; proxy_set_header Host $host; proxy_set_header X-Forwarded-For $proxy_add_x_forwarded_for; proxy_redirect off; } location /static/admin/ { alias /usr/share/nginx/html/static/admin/; } error_page 500 502 503 504 /50x.html; location = /50x.html { root /usr/share/nginx/html; } } |
wait.sh
このままだと、Reactコンテナが起動する前にNginxコンテナが起動し、
接続エラーでNginxコンテナが起動しなくなります。
そこで、以下のシェルスクリプトを使って対処します
vishnubob/wait-for-itリポジトリからコピーしてきました
|
1 2 3 4 5 6 7 8 9 10 11 12 13 14 15 16 17 18 19 20 21 22 23 24 25 26 27 28 29 30 31 32 33 34 35 36 37 38 39 40 41 42 43 44 45 46 47 48 49 50 51 52 53 54 55 56 57 58 59 60 61 62 63 64 65 66 67 68 69 70 71 72 73 74 75 76 77 78 79 80 81 82 83 84 85 86 87 88 89 90 91 92 93 94 95 96 97 98 99 100 101 102 103 104 105 106 107 108 109 110 111 112 113 114 115 116 117 118 119 120 121 122 123 124 125 126 127 128 129 130 131 132 133 134 135 136 137 138 139 140 141 142 143 144 145 146 147 148 149 150 151 152 153 154 155 156 157 158 159 160 161 162 163 164 165 166 167 168 169 170 171 172 173 174 175 176 177 178 179 180 181 182 |
#!/usr/bin/env bash # Use this script to test if a given TCP host/port are available WAITFORIT_cmdname=${0##*/} echoerr() { if [[ $WAITFORIT_QUIET -ne 1 ]]; then echo "$@" 1>&2; fi } usage() { cat << USAGE >&2 Usage: $WAITFORIT_cmdname host:port [-s] [-t timeout] [-- command args] -h HOST | --host=HOST Host or IP under test -p PORT | --port=PORT TCP port under test Alternatively, you specify the host and port as host:port -s | --strict Only execute subcommand if the test succeeds -q | --quiet Don't output any status messages -t TIMEOUT | --timeout=TIMEOUT Timeout in seconds, zero for no timeout -- COMMAND ARGS Execute command with args after the test finishes USAGE exit 1 } wait_for() { if [[ $WAITFORIT_TIMEOUT -gt 0 ]]; then echoerr "$WAITFORIT_cmdname: waiting $WAITFORIT_TIMEOUT seconds for $WAITFORIT_HOST:$WAITFORIT_PORT" else echoerr "$WAITFORIT_cmdname: waiting for $WAITFORIT_HOST:$WAITFORIT_PORT without a timeout" fi WAITFORIT_start_ts=$(date +%s) while : do if [[ $WAITFORIT_ISBUSY -eq 1 ]]; then nc -z $WAITFORIT_HOST $WAITFORIT_PORT WAITFORIT_result=$? else (echo -n > /dev/tcp/$WAITFORIT_HOST/$WAITFORIT_PORT) >/dev/null 2>&1 WAITFORIT_result=$? fi if [[ $WAITFORIT_result -eq 0 ]]; then WAITFORIT_end_ts=$(date +%s) echoerr "$WAITFORIT_cmdname: $WAITFORIT_HOST:$WAITFORIT_PORT is available after $((WAITFORIT_end_ts - WAITFORIT_start_ts)) seconds" break fi sleep 1 done return $WAITFORIT_result } wait_for_wrapper() { # In order to support SIGINT during timeout: http://unix.stackexchange.com/a/57692 if [[ $WAITFORIT_QUIET -eq 1 ]]; then timeout $WAITFORIT_BUSYTIMEFLAG $WAITFORIT_TIMEOUT $0 --quiet --child --host=$WAITFORIT_HOST --port=$WAITFORIT_PORT --timeout=$WAITFORIT_TIMEOUT & else timeout $WAITFORIT_BUSYTIMEFLAG $WAITFORIT_TIMEOUT $0 --child --host=$WAITFORIT_HOST --port=$WAITFORIT_PORT --timeout=$WAITFORIT_TIMEOUT & fi WAITFORIT_PID=$! trap "kill -INT -$WAITFORIT_PID" INT wait $WAITFORIT_PID WAITFORIT_RESULT=$? if [[ $WAITFORIT_RESULT -ne 0 ]]; then echoerr "$WAITFORIT_cmdname: timeout occurred after waiting $WAITFORIT_TIMEOUT seconds for $WAITFORIT_HOST:$WAITFORIT_PORT" fi return $WAITFORIT_RESULT } # process arguments while [[ $# -gt 0 ]] do case "$1" in *:* ) WAITFORIT_hostport=(${1//:/ }) WAITFORIT_HOST=${WAITFORIT_hostport[0]} WAITFORIT_PORT=${WAITFORIT_hostport[1]} shift 1 ;; --child) WAITFORIT_CHILD=1 shift 1 ;; -q | --quiet) WAITFORIT_QUIET=1 shift 1 ;; -s | --strict) WAITFORIT_STRICT=1 shift 1 ;; -h) WAITFORIT_HOST="$2" if [[ $WAITFORIT_HOST == "" ]]; then break; fi shift 2 ;; --host=*) WAITFORIT_HOST="${1#*=}" shift 1 ;; -p) WAITFORIT_PORT="$2" if [[ $WAITFORIT_PORT == "" ]]; then break; fi shift 2 ;; --port=*) WAITFORIT_PORT="${1#*=}" shift 1 ;; -t) WAITFORIT_TIMEOUT="$2" if [[ $WAITFORIT_TIMEOUT == "" ]]; then break; fi shift 2 ;; --timeout=*) WAITFORIT_TIMEOUT="${1#*=}" shift 1 ;; --) shift WAITFORIT_CLI=("$@") break ;; --help) usage ;; *) echoerr "Unknown argument: $1" usage ;; esac done if [[ "$WAITFORIT_HOST" == "" || "$WAITFORIT_PORT" == "" ]]; then echoerr "Error: you need to provide a host and port to test." usage fi WAITFORIT_TIMEOUT=${WAITFORIT_TIMEOUT:-15} WAITFORIT_STRICT=${WAITFORIT_STRICT:-0} WAITFORIT_CHILD=${WAITFORIT_CHILD:-0} WAITFORIT_QUIET=${WAITFORIT_QUIET:-0} # Check to see if timeout is from busybox? WAITFORIT_TIMEOUT_PATH=$(type -p timeout) WAITFORIT_TIMEOUT_PATH=$(realpath $WAITFORIT_TIMEOUT_PATH 2>/dev/null || readlink -f $WAITFORIT_TIMEOUT_PATH) WAITFORIT_BUSYTIMEFLAG="" if [[ $WAITFORIT_TIMEOUT_PATH =~ "busybox" ]]; then WAITFORIT_ISBUSY=1 # Check if busybox timeout uses -t flag # (recent Alpine versions don't support -t anymore) if timeout &>/dev/stdout | grep -q -e '-t '; then WAITFORIT_BUSYTIMEFLAG="-t" fi else WAITFORIT_ISBUSY=0 fi if [[ $WAITFORIT_CHILD -gt 0 ]]; then wait_for WAITFORIT_RESULT=$? exit $WAITFORIT_RESULT else if [[ $WAITFORIT_TIMEOUT -gt 0 ]]; then wait_for_wrapper WAITFORIT_RESULT=$? else wait_for WAITFORIT_RESULT=$? fi fi if [[ $WAITFORIT_CLI != "" ]]; then if [[ $WAITFORIT_RESULT -ne 0 && $WAITFORIT_STRICT -eq 1 ]]; then echoerr "$WAITFORIT_cmdname: strict mode, refusing to execute subprocess" exit $WAITFORIT_RESULT fi exec "${WAITFORIT_CLI[@]}" else exit $WAITFORIT_RESULT fi |
Dockerfile
|
1 2 3 4 5 6 7 8 9 10 11 12 13 14 |
FROM nginx:1.17.4-alpine RUN apk add --no-cache bash COPY wait.sh /wait.sh RUN chmod +x /wait.sh CMD ["/wait.sh", "react:3000", "--", "nginx", "-g", "daemon off;"] # confファイルのバックアップ RUN mv /etc/nginx/conf.d/default.conf /etc/nginx/conf.d/default.conf.org # 用意したconfファイルをコピー COPY default.conf /etc/nginx/conf.d |
docker-compose.yml
以下をservices内に追記します
|
1 2 3 4 5 6 7 8 9 10 11 12 13 14 15 16 17 18 19 20 |
services: -----略--------- -----追加------- nginx: container_name: nginx build: context: ./nginx/. dockerfile: Dockerfile volumes: - static_volume:/usr/share/nginx/html/static ports: - "80:80" depends_on: - web-back - react networks: - backend_network - frontend_network -----ここまで--- -----略--------- |
コンテナを立ち上げてみる
毎度おなじみの
docker-compose up -d
を実行します
ブラウザからアクセス
にアクセスします(少し時間をおいてからのほうがいいかも?)

こちらが表示されていればOKです
また、
にアクセスします

こちらが表示されていればOKです
所感
とりあえず、動くことまでをやってみました
- 環境の差異を考慮できていない
- Dockerの設定を詳細に理解できていない
- nginxの設定がいけてない
などなどありますが、それはこれから勉強していきますということで
(おまけ)その他詰まったこと
Dockerを起動してから、dockerコマンドを実行しましょう

参考文献
全体

Docker


MySQL

Python(Django)


コメント