Node.js および TypeScript のORMであるPrisma。
Next.jsでつかってみたいので、設定していきます!
そもそも ORM とは?
ORM(Object Relational Mapper)とは、オブジェクト指向のようにRDBを操作できるもの。
SQLを書く必要がなく、プログラミング言語とRDBの間を取り持ってくれるというイメージ。
つまり、プログラム ↔ ORM ↔ RDB となります。
あらためて Prisma とは?

こちらの公式ドキュメントによると、
プリズマは、オープンソース次世代ORM。これは次の部分で構成されます。
Prisma Client : Node.js および TypeScript 用の自動生成されたタイプセーフなクエリ ビルダー
Prisma Migrate : 移行システム
Prisma Studio : データベース内のデータを表示および編集するための GUI。
Node.js や TypeScript用のORMということですね。
Prisma が必要としている要件やサポートしているバージョンは下記をご覧ください!
・要件

・サポートされているフレームワーク

・サポートされているDB

バージョン
| バージョン | |
| Prisma | 5.2.0 |
| Prisma Client | 5.2.0 |
| Prisma Studio | 0.494.0 |
| Node.js | 18.17.0 |
| Next.js | 13.4.19 |
| Docker | 20.10.21 |
| PostgreSQL | 15.4 |
完成したアプリケーション
こちらのGitHubリポジトリに完成したアプリケーションをpushしました。
ご参考ください!!
下準備
Next.jsのアプリを作成
もととなるNext.jsのサンプルアプリを作成します。
コマンド実行後にきかれるものはすべてデフォルトのままにしておきます。
|
1 |
$ npx create-next-app sample-prisma-next-app |
作成出来たら、動くか確認しておきます
|
1 2 |
$ cd sample-prisma-next-app $ npm run dev |
http://localhost:3000 にアクセスして、表示されればOKです!
PostgreSQL コンテナを起動
↓を参考にコンテナを起動していきます。

PostgreSQL コンテナ用のフォルダを作成します。
ファイルの構成は以下とします。
|
1 2 3 4 5 6 7 |
PostgreSQL$ tree . ├── config │ └── postgresql.conf ├── docker-compose.yml └── sql └── init.sql # コンテナの初回起動時のみ実行したいファイル |
各ファイルの中身はこんな感じ
|
1 |
listen_addresses = '*' |
|
1 2 3 4 5 6 7 8 9 10 11 12 13 14 15 16 17 18 19 20 21 22 23 24 25 |
version: '3' services: db: image: postgres:15.4 container_name: postgres # confファイルの指定 command: -c 'config_file=/etc/postgresql/postgresql.conf' ports: - 5432:5432 volumes: # DBのデータをボリュームマウント - db-store:/var/lib/postgresql/data # sqlファイルをコンテナにバインドマウント # コンテナの初回起動時のみ実行されるsql - ./sql/init:/docker-entrypoint-initdb.d # 任意のSQLファイルを実行できるようにバインドマウント - ./sql/tmp:/tmp # confファイルをコンテナにバインドマウント - ./config/postgresql.conf:/etc/postgresql/postgresql.conf environment: # スーパーユーザーのパスワード - POSTGRES_PASSWORD=passw0rd volumes: db-store: |
|
1 2 3 4 5 6 7 8 9 10 11 12 13 14 15 16 17 18 19 20 21 22 23 24 |
-- Prismaが使用するユーザー作成 CREATE USER prismauser WITH PASSWORD 'prismapassword'; ALTER ROLE prismauser SET CLIENT_ENCODING TO 'utf8'; ALTER ROLE prismauser SET DEFAULT_TRANSACTION_ISOLATION TO 'read committed'; ALTER ROLE prismauser SET TIMEZONE TO 'Asia/Tokyo'; -- prisma migrateする際に必要な権限 -- https://www.prisma.io/docs/concepts/components/prisma-migrate/shadow-database#shadow-database-user-permissions ALTER ROLE prismauser CREATEDB; -- DATABASE作成 CREATE DATABASE prismadb; -- 作成したDBへ切り替え \c prismadb -- スキーマ作成 CREATE SCHEMA prismaschema; -- 権限追加 GRANT CREATE ON DATABASE prismadb TO prismauser; GRANT USAGE ON SCHEMA prismaschema TO prismauser; GRANT CREATE ON SCHEMA prismaschema TO prismauser; GRANT DELETE, INSERT, SELECT, UPDATE ON ALL TABLES IN SCHEMA prismaschema TO prismauser; GRANT SELECT, UPDATE ON ALL SEQUENCES IN SCHEMA prismaschema TO prismauser; |
ファイルを作成したら、コンテナを起動して入ってみます
|
1 2 3 4 5 6 7 8 9 10 11 12 13 14 15 16 17 18 19 20 21 22 23 24 25 26 27 28 29 30 31 32 33 34 35 |
// コンテナを起動 PostgreSQL$ docker compose up -d [+] Running 3/3 ✔ Network postgresql_default Created 0.0s ✔ Volume "postgresql_db-store" Created 0.0s ✔ Container postgres Started // コンテナに入る PostgreSQL$ docker exec -it postgres /bin/sh // PostgreSQLにログイン # psql -h localhost -U prismauser prismadb psql (15.4 (Debian 15.4-1.pgdg120+1)) Type "help" for help. // スキーマを確認 prismadb=> \dn; List of schemas Name | Owner --------------+------------------- prismaschema | postgres public | pg_database_owner (2 rows) // スキーマを確認 prismadb=> select prismaschema; // テーブル確認:作ってないのでない prismadb-> \dt; Did not find any relations. // ログアウト prismadb-> \q // コンテナから抜ける # exit PostgreSQL$ |
うまく起動できているのでこれでOKです!
Prismaをつかってみる
Next.jsアプリのルートディレクトリに移動して下さい
Prismaをインストール
|
1 2 3 4 5 6 7 8 9 10 11 12 13 14 15 16 17 18 19 20 |
// インストール sample-prisma-next-app$ npm install prisma --save-dev added 2 packages, and audited 332 packages in 6s 117 packages are looking for funding run `npm fund` for details found 0 vulnerabilities // 確認 sample-prisma-next-app$ npx prisma --version prisma : 5.2.0 @prisma/client : Not found Current platform : debian-openssl-3.0.x Query Engine (Node-API) : libquery-engine 2804dc98259d2ea960602aca6b8e7fdc03c1758f (at node_modules/@prisma/engines/libquery_engine-debian-openssl-3.0.x.so.node) Schema Engine : schema-engine-cli 2804dc98259d2ea960602aca6b8e7fdc03c1758f (at node_modules/@prisma/engines/schema-engine-debian-openssl-3.0.x) Schema Wasm : @prisma/prisma-schema-wasm 5.2.0-25.2804dc98259d2ea960602aca6b8e7fdc03c1758f Default Engines Hash : 2804dc98259d2ea960602aca6b8e7fdc03c1758f Studio : 0.494.0 |
–save-dev をつけるのはなぜなのかは↓の記事を読んでみるとわかると思います


Prismaをセットアップ
|
1 |
npx prisma init |
↑のコマンドを実行します。
PostgreSQL以外を使用する方は、datasource-provider オプションで指定します。(参考)
これによって
- prismaフォルダとその配下にschema.prismaを作成
- .env を作成 ※gitにコミットしないように.gitignoreに.envを追記しましょう
がなされます。
(実行結果)
|
1 2 3 4 5 6 7 8 9 10 11 12 13 14 15 16 17 18 19 20 21 22 23 24 |
sample-prisma-next-app$ npx prisma init <img draggable="false" data-mce-resize="false" data-mce-placeholder="1" data-wp-emoji="1" class="emoji" alt="<img draggable="false" data-mce-resize="false" data-mce-placeholder="1" data-wp-emoji="1" class="emoji" alt="✔" src="https://s.w.org/images/core/emoji/14.0.0/svg/2714.svg">" src="https://s.w.org/images/core/emoji/14.0.0/svg/2714.svg"> Your Prisma schema was created at prisma/schema.prisma You can now open it in your favorite editor. warn You already have a .gitignore file. Don't forget to add `.env` in it to not commit any private information. Next steps: 1. Set the DATABASE_URL in the .env file to point to your existing database. If your database has no tables yet, read https://pris.ly/d/getting-started 2. Set the provider of the datasource block in schema.prisma to match your database: postgresql, mysql, sqlite, sqlserver, mongodb or cockroachdb. 3. Run prisma db pull to turn your database schema into a Prisma schema. 4. Run prisma generate to generate the Prisma Client. You can then start querying your database. More information in our documentation: https://pris.ly/d/getting-started // フォルダやファイルが作成されたか確認 sample-prisma-next-app$ ll prisma/ total 0 drwxrwxrwx 1 ****** ****** 4096 Aug 28 23:44 ./ drwxrwxrwx 1 ****** ****** 4096 Aug 28 23:44 ../ -rwxrwxrwx 1 ****** ****** 236 Aug 28 23:44 schema.prisma* sample-prisma-next-app$ ll .env -rwxrwxrwx 1 ****** ****** 519 Aug 28 23:44 .env* |
DBの接続情報を設定する
先ほど作成されたschema.jsonの中身を見てみます
|
1 2 3 4 5 6 7 8 9 10 11 |
// This is your Prisma schema file, // learn more about it in the docs: https://pris.ly/d/prisma-schema generator client { provider = "prisma-client-js" } datasource db { provider = "postgresql" url = env("DATABASE_URL") } |
このうち、DBに関する記述は8~11行目のdatasource db の部分になります
| プロパティ | 説明 | 値 |
|
provider
|
使用するDBの種類 |
“postgresql”
|
|
url
|
DBの接続情報 |
env(“DATABASE_URL”)
|
url は値を直書きせずに、DATABASE_URL という環境変数から読み取るようになっています
そこで、schema.json と一緒に作成された .env ファイルをみます
|
1 2 3 4 5 6 7 |
# Environment variables declared in this file are automatically made available to Prisma. # See the documentation for more detail: https://pris.ly/d/prisma-schema#accessing-environment-variables-from-the-schema # Prisma supports the native connection string format for PostgreSQL, MySQL, SQLite, SQL Server, MongoDB and CockroachDB. # See the documentation for all the connection string options: https://pris.ly/d/connection-strings DATABASE_URL="postgresql://johndoe:randompassword@localhost:5432/mydb?schema=public" |
DATABASE_URL が定義されているので、値を書き換えていきます。
PostgreSQLの場合は、下記のフォーマットになっています
|
1 2 |
// 大文字:人によって値が異なるため、適宜書き換える postgresql://USER:PASSWORD@HOST:PORT/DATABASE?schema=SCHEMA |
筆者の場合は、
| プロパティ | 設定値 |
| USER |
prismauser
|
| PASSWORD |
prismapassword
|
| HOST | localhost |
| PORT |
5432
|
| DATABASE |
prismadb
|
| SCHEMA |
prismaschema
|
となるので、.env を
|
1 |
DATABASE_URL="postgresql://prismauser:prismapassword@localhost:5432/prismadb?schema=prismaschema" |
に書き換えます
Prisma Migrateしてみる
schema.prismaでData Modelを定義して、DBに反映してみます
まず、schema.prismaにData Modelを定義します
|
1 2 3 4 5 6 7 8 9 10 11 12 13 14 15 16 17 18 19 20 21 22 23 24 25 26 27 28 29 30 31 32 33 34 |
generator client { provider = "prisma-client-js" } datasource db { provider = "postgresql" url = env("DATABASE_URL") } model Post { id Int @id @default(autoincrement()) createdAt DateTime @default(now()) updatedAt DateTime @updatedAt title String @db.VarChar(255) content String? published Boolean @default(false) author User @relation(fields: [authorId], references: [id]) authorId Int } model Profile { id Int @id @default(autoincrement()) bio String? user User @relation(fields: [userId], references: [id]) userId Int @unique } model User { id Int @id @default(autoincrement()) email String @unique name String? posts Post[] profile Profile? } |
↓のコマンドでschema.prismaの内容をDBに反映させます。
|
1 |
npx prisma migrate dev --name init |
これで2つのことが実行されます
- schema.prismaをもとに、DBに実行する用のSQLファイルを作成
- 1. で作成されたSQLファイルをDBに実行する
(実行結果)
|
1 2 3 4 5 6 7 8 9 10 11 12 13 14 15 16 17 18 19 20 21 22 23 24 25 |
sample-prisma-next-app$ npx prisma migrate dev --name init Environment variables loaded from .env Prisma schema loaded from prisma/schema.prisma Datasource "db": PostgreSQL database "prismadb", schema "prismaschema" at "localhost:5432" Applying migration `20230903073559_init` The following migration(s) have been created and applied from new schema changes: migrations/ └─ 20230903073559_init/ └─ migration.sql Your database is now in sync with your schema. Running generate... (Use --skip-generate to skip the generators) added 2 packages, and audited 334 packages in 7s 117 packages are looking for funding run `npm fund` for details found 0 vulnerabilities ✔ Generated Prisma Client (v5.2.0) to ./node_modules/@prisma/client in 343ms |
エラーが出た方は↓を参考にしてみてください
成功したら、prismaフォルダにmigrationsフォルダとSQLファイルが作成されています
|
1 2 3 4 5 6 7 |
sample-prisma-next-app$ tree prisma prisma ├── migrations │ ├── 20230903073559_init │ │ └── migration.sql # これが作成・実行されたSQLファイル │ └── migration_lock.toml └── schema.prisma |
migration.sqlを見てみると、
schema.prismaで定義した3つのData Modelに対応する3つのテーブルを作成しています
|
1 2 3 4 5 6 7 8 9 10 11 12 13 14 15 16 17 18 19 20 21 22 23 24 25 26 27 28 29 30 31 32 33 34 35 36 37 38 39 40 41 42 |
-- CreateTable CREATE TABLE "Post" ( "id" SERIAL NOT NULL, "createdAt" TIMESTAMP(3) NOT NULL DEFAULT CURRENT_TIMESTAMP, "updatedAt" TIMESTAMP(3) NOT NULL, "title" VARCHAR(255) NOT NULL, "content" TEXT, "published" BOOLEAN NOT NULL DEFAULT false, "authorId" INTEGER NOT NULL, CONSTRAINT "Post_pkey" PRIMARY KEY ("id") ); -- CreateTable CREATE TABLE "Profile" ( "id" SERIAL NOT NULL, "bio" TEXT, "userId" INTEGER NOT NULL, CONSTRAINT "Profile_pkey" PRIMARY KEY ("id") ); -- CreateTable CREATE TABLE "User" ( "id" SERIAL NOT NULL, "email" TEXT NOT NULL, "name" TEXT, CONSTRAINT "User_pkey" PRIMARY KEY ("id") ); -- CreateIndex CREATE UNIQUE INDEX "Profile_userId_key" ON "Profile"("userId"); -- CreateIndex CREATE UNIQUE INDEX "User_email_key" ON "User"("email"); -- AddForeignKey ALTER TABLE "Post" ADD CONSTRAINT "Post_authorId_fkey" FOREIGN KEY ("authorId") REFERENCES "User"("id") ON DELETE RESTRICT ON UPDATE CASCADE; -- AddForeignKey ALTER TABLE "Profile" ADD CONSTRAINT "Profile_userId_fkey" FOREIGN KEY ("userId") REFERENCES "User"("id") ON DELETE RESTRICT ON UPDATE CASCADE; |
Prisma Client をインストール
PrismaをNext.jsのアプリから呼び出せるようにPrisma Clientをインストールします
|
1 |
npm install @prisma/client |
こちらのコマンドを実行すると、
- パッケージのインストール
- prisma generate : schema.prisma で定義した内容をPrisma Clientへインポート
を行います。
(実行結果)
|
1 2 3 4 5 6 7 8 |
sample-prisma-next-app$ npm install @prisma/client up to date, audited 334 packages in 3s 117 packages are looking for funding run `npm fund` for details found 0 vulnerabilities |
Prisma Clientをつかってみる
Next.jsアプリ内でPrisma Clientを使って、DBへのデータの読み書きを行います
下記のようなアプリケーションを作成してみます
- プロフィールとともにユーザーを登録する
- 登録されているユーザー一覧を取得し、表示する
ディレクトリ構成
|
1 2 3 4 5 6 7 8 9 10 11 12 13 14 |
src ├── app │ ├── api │ │ └── user │ │ └── route.ts # ファイル作成 │ ├── favicon.ico │ ├── globals.css │ ├── layout.tsx │ └── page.tsx ├── components │ ├── addUser.tsx # ファイル作成 │ └── userList.tsx # ファイル作成 └── lib └── prisma.ts # ファイル作成 |
コード
・src/app/global.css
これがあると画面が見づらいので中身を空にしておきます
・src/app/page.tsx
後述するコンポーネントを呼び出します
|
1 2 3 4 5 6 7 8 9 10 11 12 13 |
import AddUser from "@/components/addUser"; import UserList from "@/components/userList" export default async function Home() { return ( <div> {/* User登録を行うコンポーネント */} <AddUser /> {/* User一覧を表示するコンポーネント */} <UserList /> </div> ); } |
・src/app/user/route.ts
Prisma Clientを使用してDBとやり取りする処理をAPI化しておく
http://localhost:3000/api/user がエンドポイントになります
|
1 2 3 4 5 6 7 8 9 10 11 12 13 14 15 16 17 18 19 20 21 22 23 24 25 26 27 28 29 30 31 32 33 34 35 36 37 38 39 40 |
import { NextRequest, NextResponse } from "next/server"; // Prisma Clientのインスタンスをインポート import prisma from "@/lib/prisma"; export async function GET() { const userArray = await prisma.user.findMany({ include: { // true: 外部キーを設定しているテーブルの情報も一緒に持ってくる posts: true, profile: true, }, }); // Response を jsonで返す return NextResponse.json(userArray); } export async function POST(req: NextRequest) { // リクエストボディ const { name, email, postTitle, profile } = await req.json(); const res = await prisma.user.create({ data: { name: name, email: email, // ネストすることで参照先のテーブルに書き込める // Postテーブルに書き込む posts: { create: { title: postTitle }, }, // Profileテーブルに書き込む profile: { create: { bio: profile }, }, }, }); return NextResponse.json(res); } |
・src/components/addUser.tsx
ユーザー登録を行うコンポーネント
|
1 2 3 4 5 6 7 8 9 10 11 12 13 14 15 16 17 18 19 20 21 22 23 24 25 26 27 28 29 30 31 32 33 34 35 36 37 38 39 40 41 42 43 44 45 46 47 48 49 50 51 52 53 54 55 56 57 58 59 60 61 62 63 64 65 66 67 68 69 70 71 72 73 74 75 76 77 78 79 80 81 82 83 84 85 86 87 88 89 90 91 92 93 94 95 96 97 98 99 100 101 102 103 104 105 106 107 108 109 110 111 112 113 114 115 116 117 118 119 120 121 |
// input タグのonChangeを使うためにServer Componentにする "use client"; import { useRouter } from "next/navigation"; import { useState } from "react"; export default function AddUser() { const router = useRouter(); const [name, setName] = useState(""); const [email, setEmail] = useState(""); const [postTitle, setPostTitle] = useState(""); const [profile, setProfile] = useState(""); // Userテーブルへデータを書き込む // 注意:emailが重複禁止となっている const fetchAsyncAddUser = async () => { // 入力されていないものがあれば、登録しない if (name == "" || email == "" || postTitle == "" || profile == "") { console.log("すべての項目を埋めてください"); return; } // APIのURL const url = "http://localhost:3000/api/user"; // リクエストパラメータ const params = { method: "POST", // JSON形式のデータのヘッダー headers: { "Content-Type": "application/json", }, // リクエストボディ body: JSON.stringify({ name: name, email: email, postTitle: postTitle, profile: profile, }), }; // APIへのリクエスト await fetch(url, params); // 入力値を初期化 setName(""); setEmail(""); setPostTitle(""); setProfile(""); // 画面をリフレッシュ router.refresh(); }; // inputタグのvalueに変化があった際に実行される const changeNameInput = (e: React.ChangeEvent<HTMLInputElement>) => { setName(e.target.value); }; // inputタグのvalueに変化があった際に実行される const changeEmailInput = (e: React.ChangeEvent<HTMLInputElement>) => { setEmail(e.target.value); }; // inputタグのvalueに変化があった際に実行される const changePostTitleInput = (e: React.ChangeEvent<HTMLInputElement>) => { setPostTitle(e.target.value); }; // inputタグのvalueに変化があった際に実行される const changeProfileInput = (e: React.ChangeEvent<HTMLInputElement>) => { setProfile(e.target.value); }; return ( <div> <h2>Add User</h2> <div> <div> <label>Name:</label> <input type="text" name="name" value={name} onChange={changeNameInput} /> </div> <div> <label>Email:</label> <input type="text" name="email" value={email} onChange={changeEmailInput} /> </div> <div> <label>Post Title:</label> <input type="text" name="postTitle" value={postTitle} onChange={changePostTitleInput} /> </div> <div> <label>Profile:</label> <input type="text" name="profile" value={profile} onChange={changeProfileInput} /> </div> <div> <button onClick={fetchAsyncAddUser}>追加</button> </div> </div> </div> ); } |
・src/components/userList.tsx
ユーザー一覧を表示するコンポーネント
|
1 2 3 4 5 6 7 8 9 10 11 12 13 14 15 16 17 18 19 20 21 22 23 |
export default async function UserList() { // APIのURL const url = "http://localhost:3000/api/user"; // APIへリクエスト const res = await fetch(url, { cache: "no-store", }); // レスポンスボディを取り出す const data = await res.json(); return ( <div> <h2>All Users</h2> {data.map((user: any, index: any) => ( <div key={index}> Name: {user.name} Email: {user.email} Posts: {user.posts.map((value: any) => `${value.title},`)} Profile: {user.profile?.bio} </div> ))} </div> ); } |
・src/lib/prisma.ts
ベストプラクティスに沿って、Prisma Clientをシングルトンにしておきます
このファイルでのみPrisma Clientをインスタンス化し、ほかのファイルから呼び出します
|
1 2 3 4 5 6 7 8 9 10 11 12 13 14 15 16 17 18 19 20 |
// Prisma Clientのインポート import { PrismaClient } from "@prisma/client"; const prismaClientSingleton = () => { return new PrismaClient({ log: ["query"], }); }; type PrismaClientSingleton = ReturnType<typeof prismaClientSingleton>; const globalForPrisma = globalThis as unknown as { prisma: PrismaClientSingleton | undefined; }; const prisma = globalForPrisma.prisma ?? prismaClientSingleton(); export default prisma; if (process.env.NODE_ENV !== "production") globalForPrisma.prisma = prisma; |
動作確認
できたら、サーバーを立ち上げます
|
1 |
npm run dev |
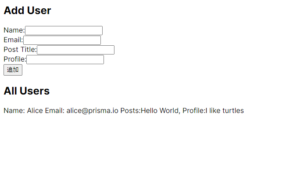
http://localhost:3000/ にアクセスして、↓のように表示されると思います

各項目を埋めて「追加」ボタンをクリックしてください。
All Usersの下に登録したユーザーが表示されれば、データの読み書きともにうまくいってそうです。
(例えば↓のような感じです)

動作確認が終わったら、Ctrl+C等でアプリを終了させてください
Prisma Studioをつかってみる
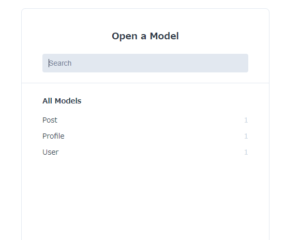
Prisma Studio(データベース内のデータを表示および編集するための GUI)を起動させてみます。
|
1 |
npx prisma studio |
すると、ブラウザに自動で表示されます

ここから、テーブルやレコードの状態を確認できます
最後に
Prisma のチュートリアルを通して、Next.jsで使ってみました
ORMは便利ですねーー!
Prisma をGraphQLと組み合わせても面白そうなので、挑戦してみます。
本記事でさくせいしたアプリをVercelへデプロイしてみたい方はこちらもチェック
エラー集
・prisma migrate でのエラー

・Prisma Clientでのエラー

参考文献


コメント